Goals/Motivations (for starting micropython-sniffs-framework and these tutorials)
"Working with IoT devices using MicroPython can be a bit daunting. Between setting up MQTT brokers, managing device settings, and syncing code to hardware like a Pico W, there's a lot of room for frustration."
An LLM wrote that quote.
No judgment—it's a hook.
Everybody loves a good hook.
I started working with MicroPython about two years ago (October 5th, 2024, as I write this). As a software developer, MicroPython has made it much easier for me to dip my toes into the embedded world.
However, I struggled to dive in and begin developing for IoT on embedded devices. There were many false starts. A significant part of my progress is due to a friend who has been incredibly helpful. I’m doing much better on my own now, but I still have a lot to learn.
Not everyone has a friend with the right expertise and willingness to help. I want to make it easier for people to write firmware for IoT, even if they have little to no experience—or at least provide a starting point for learning.
Also, I love frameworks and shiny things. I am a software developer, after all.
But I can hardly justify creating another framework just for the sake of it. So, I’ll be writing guides and tutorials that include the setup (as detailed in this post) and some small projects. This approach allows me to dogfood it, document the process, and build it as part of an iterative journey.
In this post, I’ll walk you through the basics of using the MSF CLI. We’ll cover:
Setting up a new project Interacting with an MQTT broker Syncing your code with your device in real-time Updating your device settings from an external machine Let’s dive in!
Installation
The msf-cli tool simplifies the complexity of using a new framework and assists with development. It can be installed via pip or pipx (recommended):
pipx install msf-cli
mpbridge is a utility to simplify development for MicroPython:
pipx install mpbridge
Start a New Project
msf new iot_project
cd iot_project
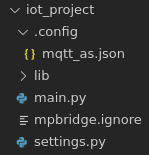
This creates a new project directory (iot_project) and installs some necessary files:

.config/mqtt_as.json: Specifies basic settings for connecting through your network using Peter Hinch'smqtt_aslibrary. You will only need to change theserver,ssid, andwifi_pwsettings.lib/: Contains all the libraries installed viamip install <packagename>.mpbridge.ignore: Specifies files that should not be synced during development.settings.py: Overrides default settings if you uncomment any variables. This won't need to be modified for this guide.main.py: Always runs on device restart. It contains scaffolding code to help you understand and validate functionality.
Start a Local Broker
msf uses MQTT (like many IoT applications) to publish and receive messages between devices and applications. The CLI has a command to start a local MQTT broker (Docker required):
msf broker up
You should see an output similar to:

The output will provide a value like 192.168.x.x:1883. Update your mqtt_as.json with the server address (you may also need to specify the port if using a non-default one):
.config/mqtt_as.json
{
  "server": "192.168.0.6",
  "port": 1883,
}
If you are connecting over WiFi, update the JSON with your WiFi SSID and password:
.config/mqtt_as.json
{
  "ssid": "your_wifi_ssid",
  "wifi_pw": "your_wifi_password"
}
To stop the broker when you're done:
msf broker down
Update/Uncomment Code in main.py
Uncomment the following code in main.py:
from msf.device import Device, Setting
duty_u16 = Setting(name="duty_u16", value=8192, description="For use in PWM of pump.")
water_pump = Device(device_name="water_pump", settings=[duty_u16])

@duty_u16.on_update()
def pump_change_duty_cycle(new_value):
    print(f"Adjusted PWM value: {new_value}")
This code does the following:
Sets up a new device with a default setting.
Checks if any current settings exist for the device and creates a new entry if none exist.
Updates the device settings persistently, even after a reset.
Runs a function when the setting changes using the
on_updatedecorator.
Connect to Your Device Using mpbridge
Connect your MicroPython device (Pico W in this case) and clear the board:
mpbridge clear a0
Sync your local files with the board:
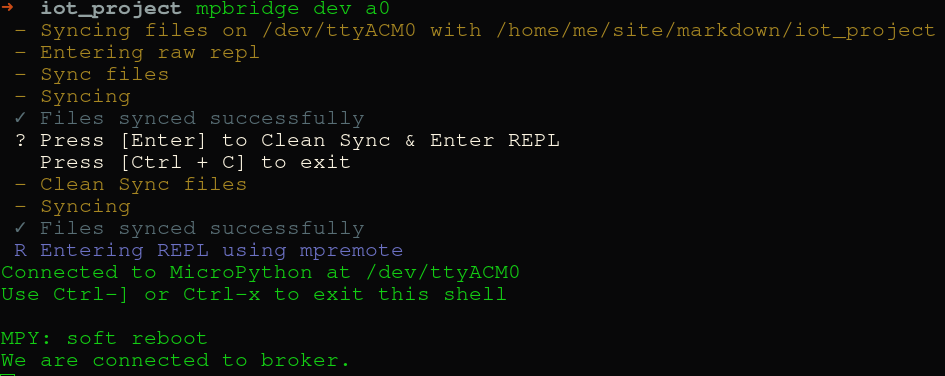
mpbridge dev a0
Wait until the files are done syncing:

Once synced, press <Enter> to enter the REPL, then press Ctrl-D to "soft-reset" the board and start running main.py. If you need to sync updates, press Ctrl+], then <Enter> to return to the REPL.
Check Device Connection to the Broker
The device should now be connected to the broker and listening for messages on the test/devices/water_pump/duty_u16/value topic:

To list all connected devices, open a new terminal and run:
MQTT_DEVICES_TOPIC=test/devices msf devices
You should see the water_pump device in the output:

Note: The default for MQTT_DEVICES_TOPIC is already "test/devices", but I wanted to show passing env vars.
To check the settings for water_pump:
msf devices water_pump

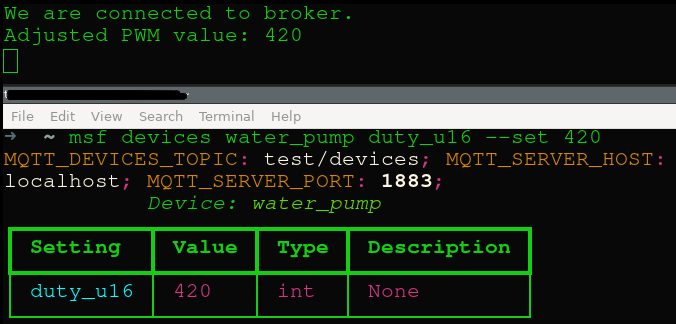
The values should match those defined in main.py. To update the setting:
msf devices water_pump duty_u16 --set 420
You should see the new value printed in the Pico W terminal:

References/Repos
Closing thoughts
"But it doesn't do anything!" "No--it does nothing."
You may wonder what we accomplished here. In all honesty, not much. However, this is just the beginning. I will be starting a small project, using this framework, that updates an ePaper display with a list of items generated and managed through voice commands using an LLM.
Now that this post is done, I can finally get started! Hip hip, hurray! 🎉
HOME